Hudson Creative Documentation
Setting Up Google Tag Manager Events Process
Setting Up Google Tag Manager Events
- Log into https://tagmanager.google.com/
- Check to see if there is an existing Account and Container for the client. If there is one, skip to step 3. If not:
- Create a new account at the Client level. The name should be the legal name of the client company. (ex. ‘Hudson Creative’)
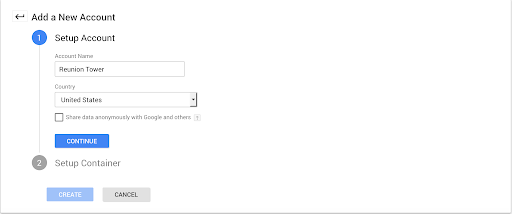
- Within this account, create a new container. This should be named for the website URL. (ex. ‘hudsoncreative.com’)
- A pop-up guide to installing tag manager should come up after the new container is created. Close this for now – we’ll come back to it.
- Within the new container, start by clicking into the ‘Variables’ section and selecting ‘Configure’ in the ‘Built-In Variables’ section of the page.
- From here, start adding in built-in variables (Check every variable under Pages, Clicks, and Forms)
- Once this is done, close the configuration screen and go to the ‘Tags’ page.
Add a new tag for Google Analytics
- Label the tag: ‘Analytics – All Pages’
- Click Tag Configuration and select ‘Google Analytics – Universal Analytics’
- Track Type: Page View
- Check the box to ‘Enable overriding settings in this tag’
- A tracking ID box should appear – the UA Tracking ID goes here.
- To find this, open up Google Analytics and select the client’s account. The UA Tracking ID should be the letters UA, followed by a dash and 8 numbers, a dash and another number.
- A tracking ID box should appear – the UA Tracking ID goes here.
- Click the ‘Triggering’ section and select the trigger called ‘All Pages’
- What this does is tell Tag Manager when to fire the tag – in this case, it will fire the tag for Google Analytics whenever a page loads. This will let us track people throughout the site as if we had hard-coded analytics into the header.
- Finally, save the tag.
Add a new tag for event tracking
- Label the tag: Event Tracking – All Clicks
- Click Tag Configuration and select ‘Google Analytics – Universal Analytics’
- Track Type: Event
- Selecting event causes a number of Event Tracking Parameters to appear. This is where the variables come in handy. {{}} denotes a variable in Tag Manager.
- Category: {{Click Element}}
- Action: Click – {{Click Text}}
- Label: {{Click URL}}
- Selecting event causes a number of Event Tracking Parameters to appear. This is where the variables come in handy. {{}} denotes a variable in Tag Manager.
- Check the box to ‘Enable overriding settings in this tag’
- A tracking ID box should appear – the UA Tracking ID goes here.
- Refer to step 4 for a refresh on how to find this.
- A tracking ID box should appear – the UA Tracking ID goes here.
- Track Type: Event
- Click the ‘Triggering’ section and click the ‘+’ sign in the upper right to make a new trigger.
- Label the Trigger ‘All Clicks – All Elements’
- Click the trigger configuration box and then select ‘All Elements’ under the ‘Click’ type.
- This trigger should fire on All Clicks.
Add tag: Form Submission
- Label the tag: Event Form Submission
- Click Tag Configuration and select ‘Google Analytics – Universal Analytics’
- Track Type: Event
- Selecting event causes a number of Event Tracking Parameters to appear. This is where the variables come in handy. {{}} denotes a variable in Tag Manager.
- Category: Form Submit – {{Form ID}}
- Action: Form Submit – {{Form Target}}
- Label: {{Form URL}}
- Selecting event causes a number of Event Tracking Parameters to appear. This is where the variables come in handy. {{}} denotes a variable in Tag Manager.
- Track Type: Event
- Check the box to ‘Enable overriding settings in this tag’
- A tracking ID box should appear – the UA Tracking ID goes here.
- Refer to step 4 for a refresh on how to find this.
- A tracking ID box should appear – the UA Tracking ID goes here.
- Click the ‘Triggering’ section and click the ‘+’ sign in the upper right to make a new trigger.
- Label the Trigger ‘Form Submission’
- Click the trigger configuration box and then select ‘Form Submission’ under the ‘User Engagement’ type.
- This trigger should fire on All Forms.
- (You may choose to have the trigger fire only on specific forms. In this case, select ‘Some Forms’ and put in the conditions where you’d like the trigger to fire.)
- If there are errors and in analytics you see too many forms tracked, you may need to ‘check validation’ to make sure the form is only tracked when a submission is successful.

Now Submit the changes you’ve made. Call the Version ‘Basic Setup – (Date)’ I put in a message with a short description of what you’ve done.
Code Installation For Shopify Sites:
- Install Google Tag Manager to get the code snippets that you will need to copy and paste into your Shopify store. Because Shopify uses templates, you only need to copy the snippets into the theme.liquid and checkout.liquid files.
- If this is your first time installing Google Tag Manager, then use the installation steps provided by Google Tag Manager. Pause at the step where you are given two code snippets to add to your web pages, and then follow the instructions below.
- If you have already installed Google Tag Manager, then you can find these code snippets in your Google Tag Manager by clicking Admin, and then clicking Install Google Tag Manager.
- In your Shopify admin, click Online store, and then click Themes.
- In the theme drop-down, click Edit Code.
- Copy the first code snippet from Google Tag Manager into thetags of your theme.liquid and checkout.liquid code:
- Copy the first code snippet from Google Tag Manager
- In your Shopify admin, open your theme.liquid file.
- Paste the code snippet as high in theof the theme.liquid code as possible.
- Open your checkout.liquid file.
- Paste the code snippet as high in theof the checkout.liquid code as possible.
- Copy the second code snippet from the Google Tag Manager into thetags of your theme.liquid and checkout.liquid code:
- In your Shopify admin, open the theme.liquid page.
- Paste the code snippet as high in theof the theme.liquid page as possible.
- Open the checkout.liquid page.
- Paste the code snippet as high in theof the checkout.liquid code as possible.
- In your Shopify admin, click Save.
- In Google Tag Manager, continue installing the Google Tag Manager. When prompted to add tags, do not add the following types of tags:
- Universal Analytics for Google Analytics
- Classic Google Analytics for Google Analytics
- Facebook Pixel.
GTM Installation for Squarespace Sites:
- Log into the client’s Squarespace site
- Select the website that you want to add Google Tag Manager to.
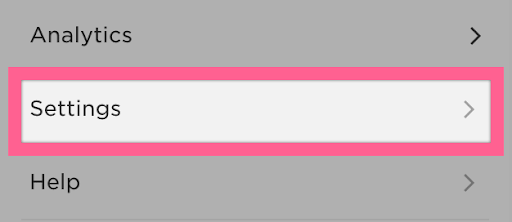
- On the sidebar click:
- “Settings”
- “Advanced”
- And then “Code Injection”.
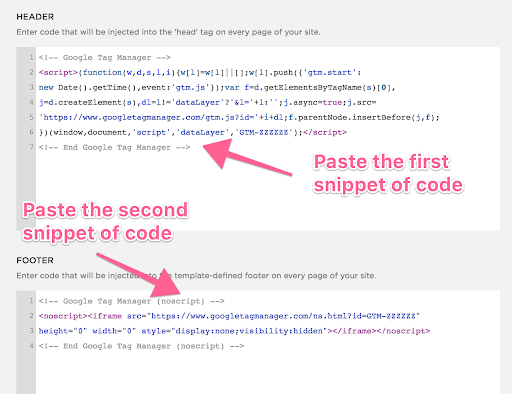
Paste the code snippets you got from Google Tag Manager, according to the picture below:
Click “SAVE” at the top-left and you’re done!
For Bentobox Sites:
- Log into the Bentobox backend
- Go to Settings > General
- Scroll to Conversion Tracking
- Add the full GTM Container ID to the respective field
- Save
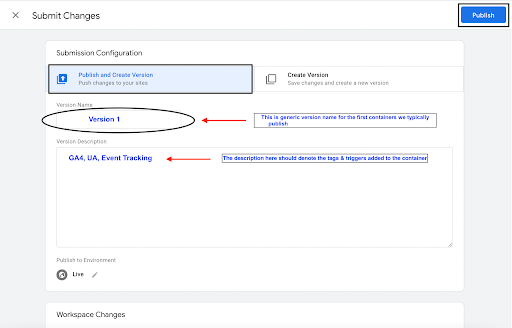
Publish a Tag
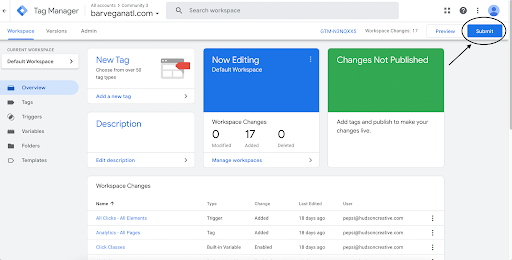
Step 1 – Click the SUBMIT button at the top right corner of the screen.
Step 2 – Enter an identifiable Version name so that it can be easily understood for the changes made.
With the version description, you can be as elaborate as possible on the changes/additions of the tag in that particular version.
Step 3 − Scroll down to the Workspace Changes, you will see all the changes made in the tags, which are unpublished or in the PREVIEW mode.
Similarly, under Activity History, you can get an exact understanding of the changes/updates that were done in the account since the beginning of time.
Step 4 − Provide a version name, description. You might want to provide the version name as First Version and you can provide the description as First Google Tag Manager Update.
For the moment, we will leave Publish to Environment as Live. This is because we don’t have any other environment apart from Live yet.
Step 5 − Click PUBLISH and you will be presented with a summary for this particular version.
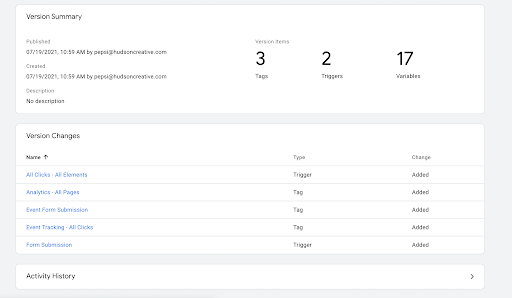
Congratulations! You have published your first tags and triggers.
If mistakes are made you can easily revert back to previously published versions, that way you can avoid tracking the wrong things, and easily edit versions to best suit your tracking needs.
Google Tag Assistant
***Something everyone should utilize when working with GTM is the Google Chrome plugin – Google Tag Assistant to see the tags getting fired without the preview mode on.