Hudson Creative Documentation
Set Up Ad Campaign (Social)
How to Create Your First Facebook Ad
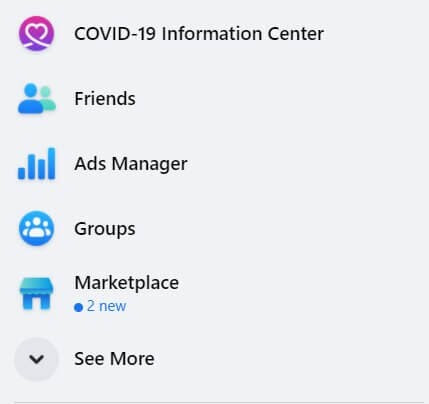
Ads Manager should appear in the left menu as one of the applications that you have available on your profile. If you can’t see the link to the manager, click on the “See More” link at the bottom of the section. This opens a dropdown menu that reveals all of the tools available to you.
Alternatively, you can directly open the Ads Manager. You can even bookmark this link to make it easily available anytime.
This will automatically open the Campaigns tab where you can start creating your first campaign.
Create A New Campaign
Choose your objective – The objective tells Facebook what you want users to do when they see your ad.
For example, do you want to target users who will be most likely to click on your link, those who will make a purchase, or do you only want to show your newest blog post to as many users as possible?
Facebook recognizes eleven different campaign objectives:
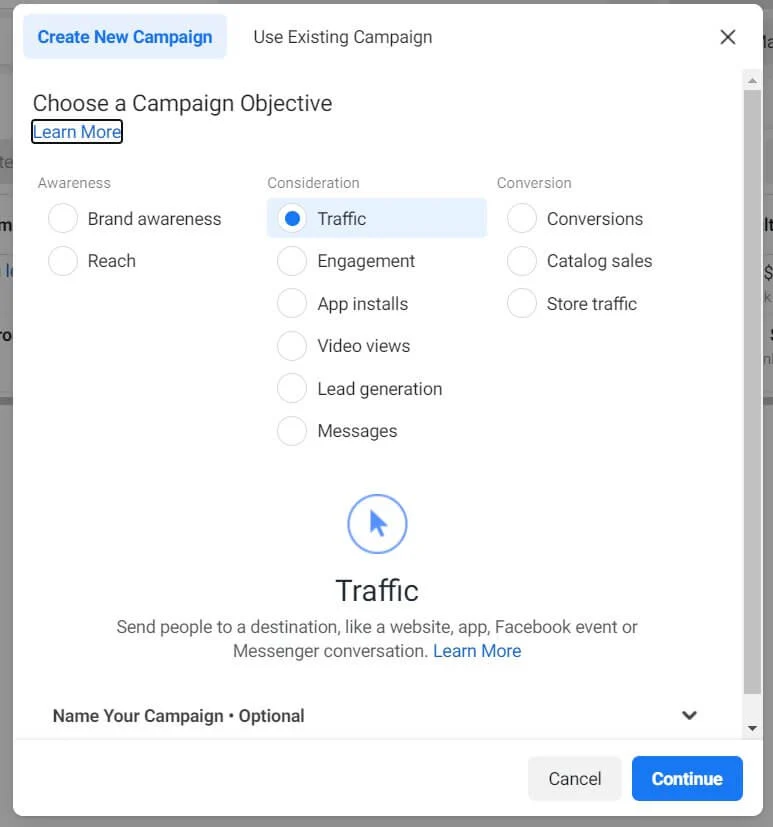 Brand awareness – Show your ads to users who will remember your brand.
Reach – Let Facebook show your ad to as many users as possible.
Traffic – Send people to your website.
Engagement – Target users who are more likely to like your post, add a comment, respond to an event, and more.
App installs – Show your ad to users who will install your app.
Video views – Get users to see your new video.
Lead generation – Target users who will be more likely to get into your sales funnel.
Messages – Target users who are more likely to send you a direct message via Messenger.
Conversions – Show ads to users who will take valuable actions like purchasing your products, subscribing, and more.
Catalog sales – Show a product catalog to new audiences who are more likely to buy something.
Store traffic – Target users who are nearby to your brick-and-mortar store.
Choose one of these objectives and click on the “Continue” button.
This action will open a new window in your Ads Manager that will guide you through the rest of the campaign setup.
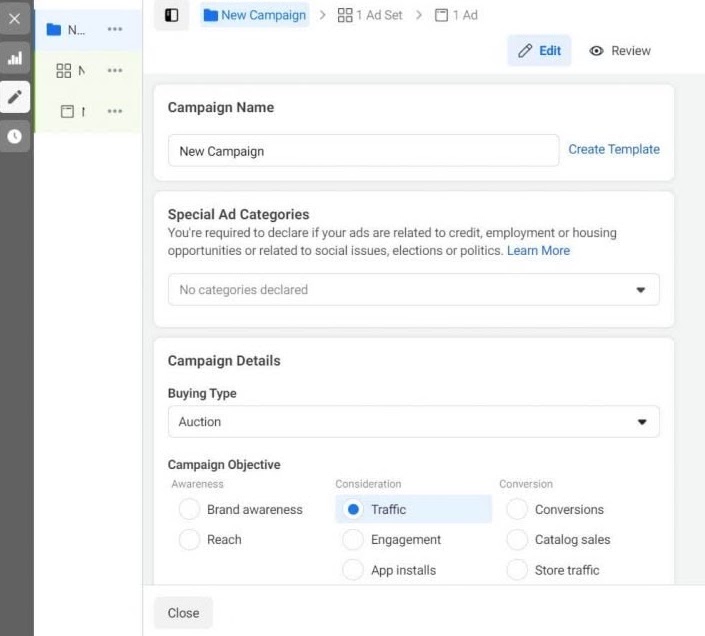
Campaign Name – Give your campaign a memorable name. This might not seem that important in the beginning, but the more ads you create, the more difficult it can be to manage a growing number of ads.
Special Ad Categories – If your ad is related to credit, employment, housing opportunities, or if it’s related to social issues, elections or politics, you have to declare the correct category here. If you do not, your ad will not be accepted.
Campaign Objective – Here you can change the objective of your campaign one more time.
AB Test – This feature allows you to create two similar ads that Facebook will test against each other. Your AB test results let you know which ad performs better so that you can allocate more resources towards the winning ad. Creating an AB test is not recommended for beginners.
Once you make a selection for each of these settings, click on the “Next” button located at the bottom-right corner of the page.
Creating The Ad Set
Next, we’ll create an ad set that will let you choose your audience, set your budget, and control the ad overall.

Ad Set Name – Name your ad set. As with the campaign name we discussed earlier, it’s important that you carefully name the ad set, so that you know what it represents anytime you open Ads Manager in the future.
Traffic – This step depends on what objective you chose when you set up the campaign. Since I chose “Traffic” as an example, this option lets you choose the details about your traffic. You can send traffic to your website, app, Messenger, or WhatsApp.
Dynamic Creative – Keep this off
Budget and Schedule – Choose the amount of money that you want to spend on the ad per day or lifetime. If your monthly budget is $800, divide by 30 days to find the your average spend per day. If the set amount of time is 6 weeks, divide 800/42 for your avg. daily spend.
Schedule – The start date is the only parameter that is required in the schedule option. Choosing this option means that the ad set will run continuously, or at least until you decide to manually stop it. Selecting the “End” option allows you to set an end date, which tells Facebook Ads Manager the time and date you want to stop running the ad.
Audience – Target specific users you want to see your ad.
Locations – Choose countries, continents, and regions that you want to target. Simply start typing the name of a country that you want to include on your target list. It is also possible to exclude specific countries and areas (for example, you can target the entire USA except for New York).
Facebook displays a map below these options so that you can also visually track the areas you are targeting. If you prefer more a map-based visual layout, you can also click on the “Drop Pin” button in the lower-left corner of the map to select a region/country.
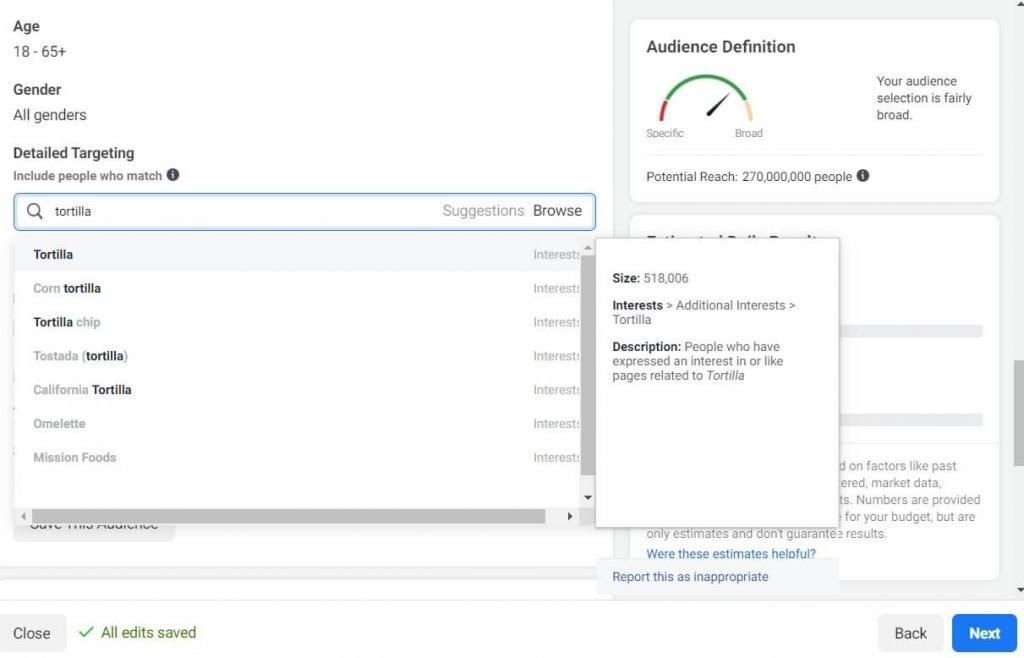
- Age – Select the minimum and maximum age of the target audience.
- Gender – You can target everyone or select a specific gender that you’re targeting. This is an important option if you’re selling a product for men or women specifically so that you don’t waste money on the other gender.
- Detailed Targeting – Fine-tune your target audience by choosing demographics, interests, and behaviors.
The amazing thing about detailed targeting is the ability to be selective about the target audience you’re looking for. If your restaurant is selling only tortillas, “food” is too broad of a term. By having only food as your detailed targeting choice, you might lose money by showing your ad to people who do not like tortillas in particular, but just like food (who doesn’t, right?). So, you want to narrow down your search by adding a new category where you will add “tortillas” as your choice.
It’s also possible to be too specific with your target audience. Maybe you want to show your restaurant to people who like corn tortillas, but who do not like pizzas. You can add that specification into detailed targeting as well.

Languages — If you want to show your ad only to users who speak a specific language, you can select that here and tell Facebook to target only those users. If you’re not sure about this, just leave it as it is.
- Save audience — Click the button to save the audience. By saving your audience, you will always have these settings under a specific name you give to this audience. If I follow the same example, I could save this audience as “Tortilla lovers from the USA who do not live in New York”. This would save you time in case you decide to start a new campaign aimed at the same audience in the future.
- Optimization & Delivery — Let Facebook know how to optimize your budget for this ad set.
You can optimize the ad delivery for:
- Landing Page Views — Show the ad to people who are more likely to click on the link and spend some time on your site or Instant Experience.
- Link Clicks — Show the ad to people who are more likely to click on the link.
- Daily Unique Reach — Show your ad to as many people as possible up to once per day. This means one person should see your ad only once per day.
- Impressions — Deliver the ad to people as many times as possible. This means Facebook will show the same ad to the same person as many times as possible.
Creating The Ad
Once the details for the ad set and campaign have all been taken care of, you can proceed to craft the ad. This is the part of the advertisement that’s visible to your target audience, and possibly the most fun part to manage.
Ad Name – Enter a name for your ad, so that you can easily recognize it in the future.
Identity – From the dropdown list, select the Facebook Business page that you have created.
Instagram Account – If you have a separate Instagram account, you can choose it here. By default, your Facebook page will be used unless specified differently.
Ad Setup
Facebook gives you three options to create your advertisement:
Create ad — Start from scratch, add images and videos, write text, and add target links.
Use existing posts — Choose a Facebook post that has been already published on your page and promote it as-is.
Use creative hub mockup — Build mockups, share them with your team, and preview on mobile devices or computers before publishing. Not for beginners.
Once you select the “Create Ad” setup
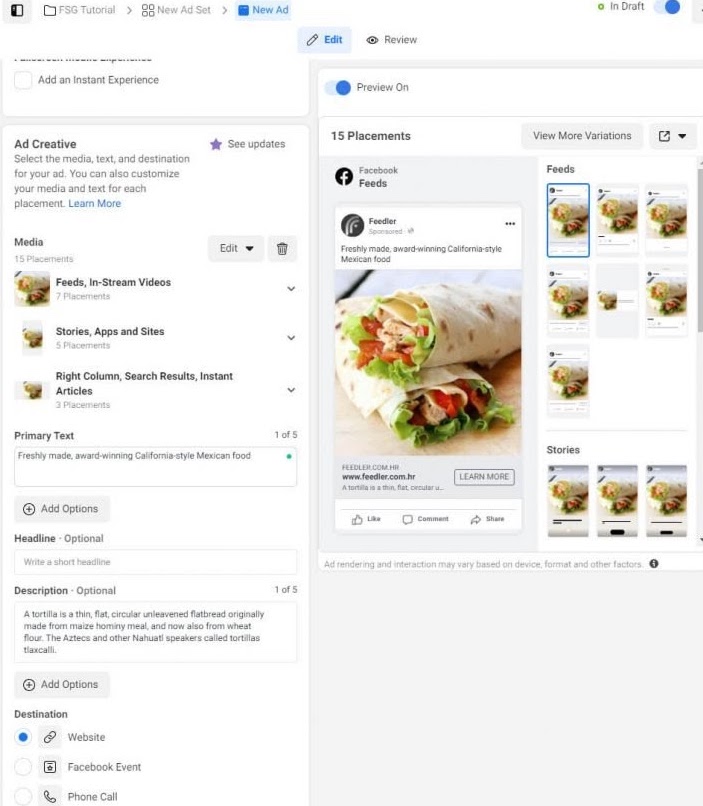
Add Media — Upload the image or video you want to use.
Primary Text — Tell people what your ad is about. (130 characters)
Headline (optional) — Write a few words to capture your audience’s attention. (30 character max)
Description — Expand on your primary text, and give a few more details about your site/product. (90 character max)
Destination — Choose if people should be redirected to your website, a Facebook event you have created, or even let them call you.
Display Link (optional) — If your target URL is long, you can add your homepage as your display link, for example.
Call Extension — Enable this feature if you want to show a call-to-action button on the bottom of your advertisement and let people contact you directly.
Call-To-Action — Choose a button that will show next to your ad.
Once all these options are filled out, you will have the opportunity to add more variations to your advertisement. The languages options let you add manual translations or choose to automatically translate the advertisement into any language of your choice. This can help you to create more directed ads that could work better with specific audiences.
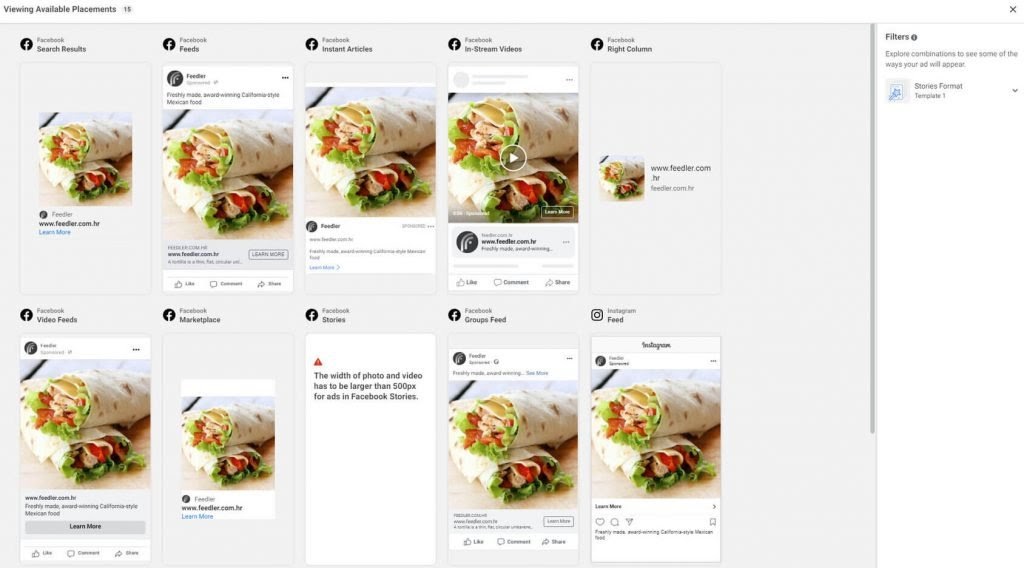
While creating your advertisement, the right-hand side of the screen will constantly update and display a preview. At any time, you can choose a different variation to see what your ad will look like when viewed on computers, mobile screens, and different Facebook placements. This will allow you to prepare an advertisement that will look great for everyone. Create ad previews to share with client.
- Click Ad Preview > 30 day link > Copy Link > Share in Asana for Accounts
Once client approval is obtained and you are happy with the result, it’s time to hit the “Publish” button.