Hudson Creative Documentation
Set Up Ad Campaign (Search)
Search Ad Campaign Setup: Step by Step Process
Goal: To create an effective Search Ad Campaign using Google Ads that is relevant to the client’s target audience for said campaign.
- Log into http://ads.google.com/
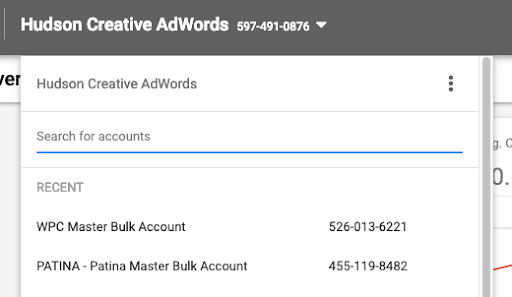
- Select the Adwords Account you are creating the Search Campaign for on the top of the page by clicking the “arrow” sign under Hudson Creative AdWords
Once you are in the client’s Google Ads Account, navigate to the Campaign section and click the blue “+” button and select “+ New Campaign”.

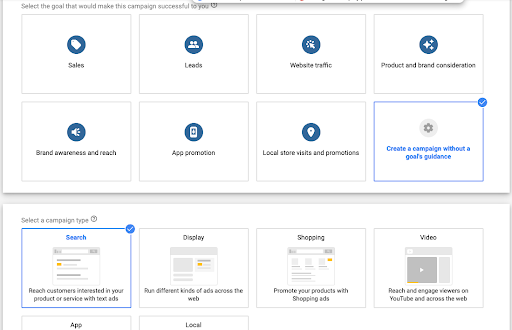
Select the “Create a Campaign without a goal’s guidance” tab, then select the “Search” tab. Rename the campaign with the format of “Client Name – Campaign Name – Search” and finally hit “Continue”
Once you see the Bidding section, click on change bid strategy and select “Clicks”.

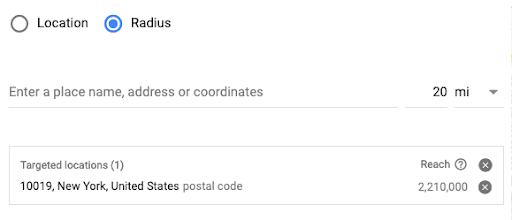
Add in the location(s) that we want to target, and then click on “Location Options.” Change the setting from Presence or interest to “Presence” only.

You can click also the “Advanced Search” button to create a radius around the place you would like to target
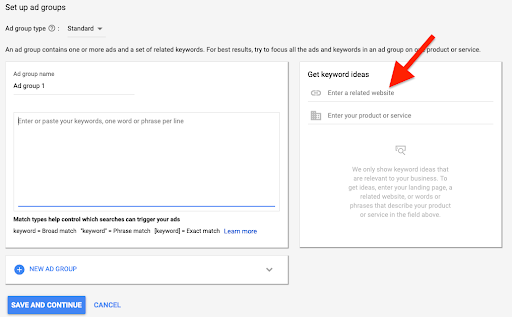
Set up the first Ad Group by typing in the keywords from the approved media plan. Unless otherwise stated, use phrase match for all keywords, by adding parentheses “” around each term. After you have a list of keywords, click the blue “save and continue” button.
- You may also type in the landing page website and Google will give you a list of recommended keywords
Creating the Search Ad
- Have at least 3 Headlines relevant to the campaign the client is running
- Hint: Headlines often target the brand, locations, offerings, and dates
- Headlines are also read in order (unless it is a dynamic search ad). Syntax matters!
- Try to utilize the keywords you have in your ad group as much as possible
- If the landing page is a non-home page, you can add 15 characters to the display path
- Finish by adding at least 2 descriptions for the search ad relevant to the campaign
- Check brand, locations, offerings, and dates
- Make sure your keywords are placed in the descriptions as well
- Once finished click Next
After you have finished setting up the search ad, review all of the information and then click to “publish” the campaign. After publishing, there are a few final steps to finish the campaign setup
- After the campaign is published,
go in and pause the campaign (a manager will review the setup before going live) - During the initial setup, we only set up one ad group. We will now need to go in and set up the additional ad groups
- To do this, you will want to click into the campaign you just reated and then click the blue “+” to create a new ad group.
- Set up all ad groups according to the approved media plan.
After all ad groups have been set up, the last step is to add “assets” to the campaign. Include as many assets from the list below as you can:
- Business Name: Use the full restaurant name as it appears on the website and Google Business Profile
- Business Logo: Use a high-quality, square-format logo with transparent or solid background
- Image: Use high-quality images of food, ambiance, or dining experience. Ensure the images align with the campaign type (e.g., a private dining setup for event bookings, a plated meal for reservations)
- Sitelink: Include links to high-intent pages such as Reservations, Private Events, Menu, Location/Hours, and Special Offers
- Callout: Showcase unique features like Michelin-Recognized Dining, Best Rooftop Brunch in NYC, Happy Hour Specials, or Live Jazz Every Weekend.
- Call: Check with account manager on what phone number should be included
- Location: If we have access, link to the Google Business Profile
Good Luck!