Hudson Creative Documentation
Moz Local Campaign
Intro:
Moz Local is an automated listing management tool with active and continuous syncing of location data to our partner directories. The primary purpose of Moz Local is to positively affect your visibility on Google by enabling you to publish location data and maintain its consistency in bulk. Rather than managing your citations one by one on each major platform, you can establish one source of truth for your information in Moz, and sync that data with our entire partner network automatically.
NAP: NAP is an acronym for Name, Address, and Phone number. The NAP for the business needs to be correct and consistent when optimizing your website and online presence for local search because Google values accurate information for its users. NAP consistency is important for local SEO because matching NAPs show legitimacy and improves the chances to rank the local business well. It also provides search engines and potential new customers with the most essential information about the business.
What You’ll Need:
- Hudson Creative’s ALA Sheet (to log into Moz)
- Client’s ABIS
Moz Local Steps:
- Log in
- Purchase “Moz Local Preferred”
- Update with ABIS Information
Log In:
- Go to https://moz.com
- In the top navigation bar, click “Log In”
- Log in using Hudson Creative’s credentials (username: [email protected]
a. Input the username and password then click the “ LOG IN “ button
Purchase “Moz Local Preferred”:
How To:
- In the top navigation bar, click “Moz Local” and click “Dashboard”
- Click “Locations” in the left-side menu
- First, search for the business by the “Business Name” (from ABIS) and click “ Search ”
- We need to check to see if a Moz Local location already exists!
- If there are no results, then continue
If there are results, then skip to the “Update with ABIS information” section
- Click “ Add Location ” in the top-left navigation
- Select “Moz Local Preferred” (should be $179 per year [plus tax, so roughly $195] or $20 per month)
- Click the “ Buy a single Location ” button
- Fill out the address information on the next page according to what’s on the client’s ABIS
- On the next page, confirm that you want to buy Moz Local for this location by clicking the golden “Confirm” button.
Update with ABIS information
Once we’ve purchased a location on Moz Local, and the ABIS has been approved, we can move forward with updating the listing with the information that’s on the ABIS.
How To:
- In the top navigation bar, click “Moz Local” and click “Dashboard”
- Click “Locations” in the left-side menu
- Search for the business by the “Business Name” (from ABIS) and click “ Search ”
- Use the client’s ABIS to update the listing’s information
- Click the hyperlinked Name of Business to begin making edits
Basic Data Tab:
- Location Name
- Needs to match the ABIS
- Use “Business Name”
- Address
- Needs to match the ABIS
- Use ABIS “Address Line 1, City, State/Province, ZIP Code
- Add the Unit or Suite # to “Address Line 2” (if applicable)
- Service Areas (if applicable)
- Try to use what’s in the ABIS “Areas You Serve”
- Categories
- Use ABIS – “Categories (Sushi Restaurant, American Cafe, etc.”
- Try to add as many from the ABIS that match, as possible
- Use ABIS – “Categories (Sushi Restaurant, American Cafe, etc.”
- Phone Number
- Needs to match the ABIS
- Use ABIS “Business Primary Phone Number”
- Website
- Use ABIS “Website URL”
- Email
- Use ABIS “Business Email Address for Public Display”
- Hours of Operation
- Needs to match the ABIS
- Use ABIS “Hours of Operation”
- Keywords
- Use ABIS “KEYWORDS & BUSINESS DESCRIPTION“ section
- Keyword #1 – Keyword #10
- Copy and paste these one by one, and press “Enter” after each one
- Short Description
- Use the first sentence from the ABIS “Business Description”
- Long Description
- Use the entire ABIS “Business Description”
- Click the green “ Save Changes ” button at the bottom
Rich Data Tab:
- Social Media Profiles
- Get these links from the ABIS (add as many as possible)
- Facebook URL
- Twitter URL
- Foursquare URL
- LinkedIn URL
- YouTube URL
- Instagram URL
- Attributes
- These come from the ABIS “ATTRIBUTES” section
- Add as many as possible, by typing in the search section and selecting Yes/No
- Payment Options
- Use the ABIS “Payment Types Accepted”
- Credit Cards = Discover, American Express, Visa, Mastercard
- Languages
- Use the ABIS “Languages Spoken”
- Services
- These can come from the ABIS “ATTRIBUTES” section
- For example, “Catering”, “Delivery”, “Counter Service” might be applicable
- Click the green “ Save Changes ” button at the bottom
Photos & Videos Tab:
We are going to add the Photos from the ABIS, including the “Company Logo”.
- Use Google Drive for this part to upload any files.
- Clients Folder > Brand > Location > ABIS Photos & Logo
- For Pepsi clients: Clients Folder > PepsiCo > Community # > Brand > Location > ABIS Photos & Logo
Make sure you add captions to these photos based on what is in the ABIS
(For Example: Image 1’s caption should correspond to Image 1’s Photo, etc.)
- Logo
- Use the ABIS “Company Logo”
- Square Logo
- Use the ABIS “Company Logo”
- Photos
- Add the Photos from the ABIS (as many that are on the ABIS)
- Image #1 -> Image #10
- Photo Captions (click the pencil icon on each photo to edit it’s caption)
- Remember to use each image’s caption from the ABIS, too!
- Once the Logos and Photos (with captions) have been added, Click the green “ Save Changes ” button at the bottom and allow the photos to upload (can take a few minutes).
Finishing Up
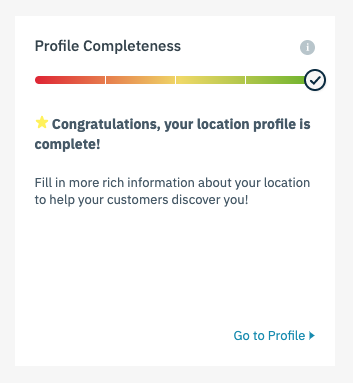
- At this point, screenshot the “Profile Completeness” section and include the map at the bottom (as seen in the following screenshot).
- Go through all the tabs titled Basic Data, Rich Data and Photos & Videos
- Double check that all the information in these tabs matches what’s on the ABIS. Especially the NAP.
- Add the screenshot of the “Profile Completeness” section to the task in Asana
- Make sure you include the slider, as well as the box with the map and Name and Address, in the screenshot
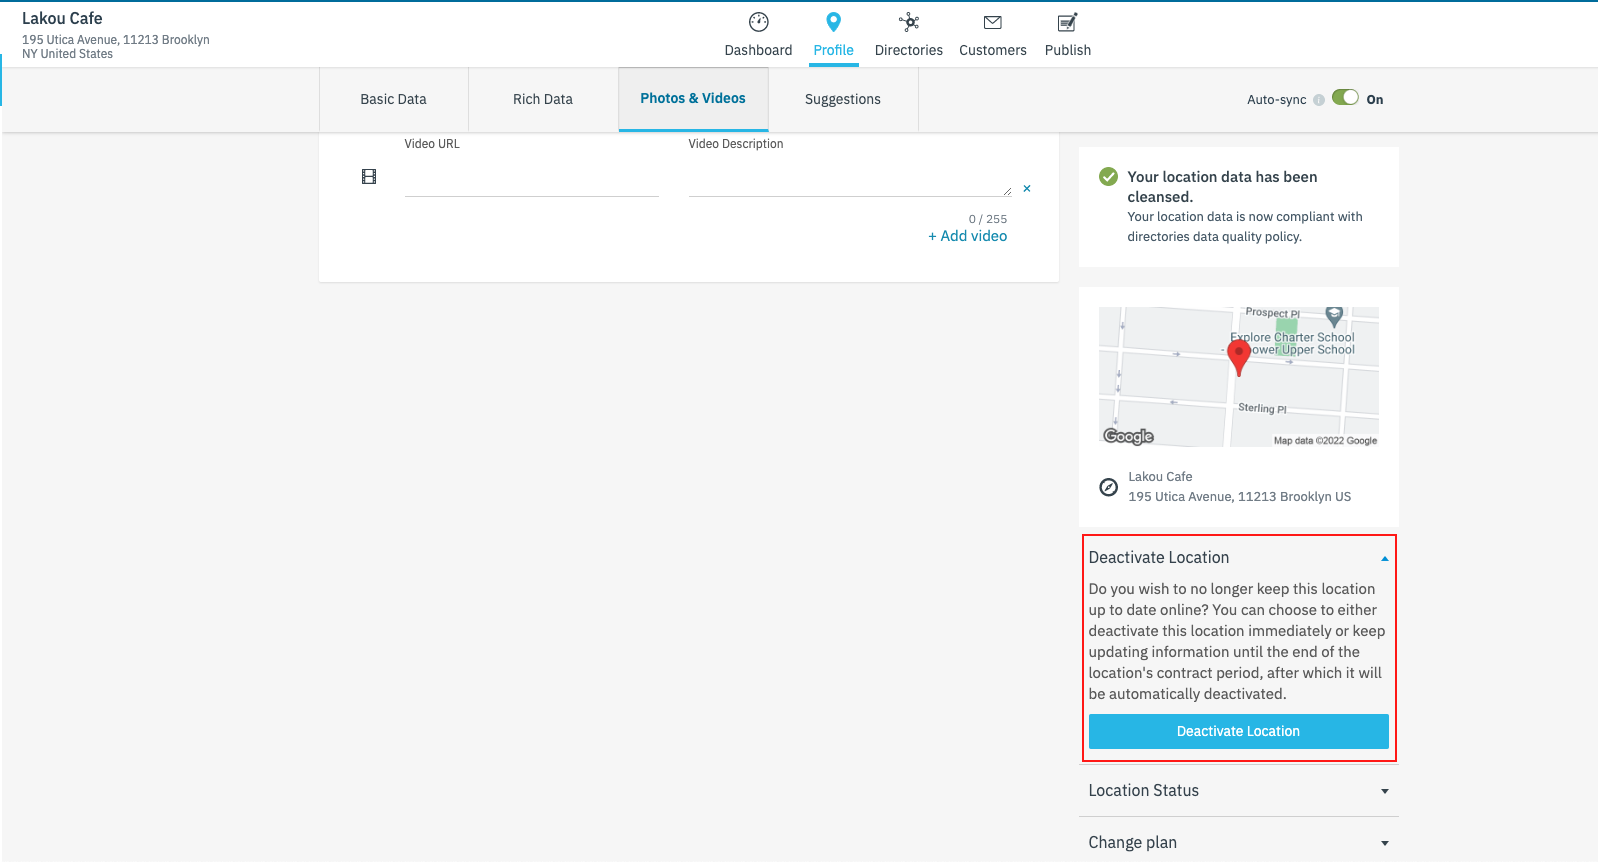
Cancel on Renewal
- After we reviewed the “Profile Completeness” we need to “Cancel on Renewal to avoid another billing.
- On the left side click on “Deactivation Location”
- Click the “Deactivation Location”
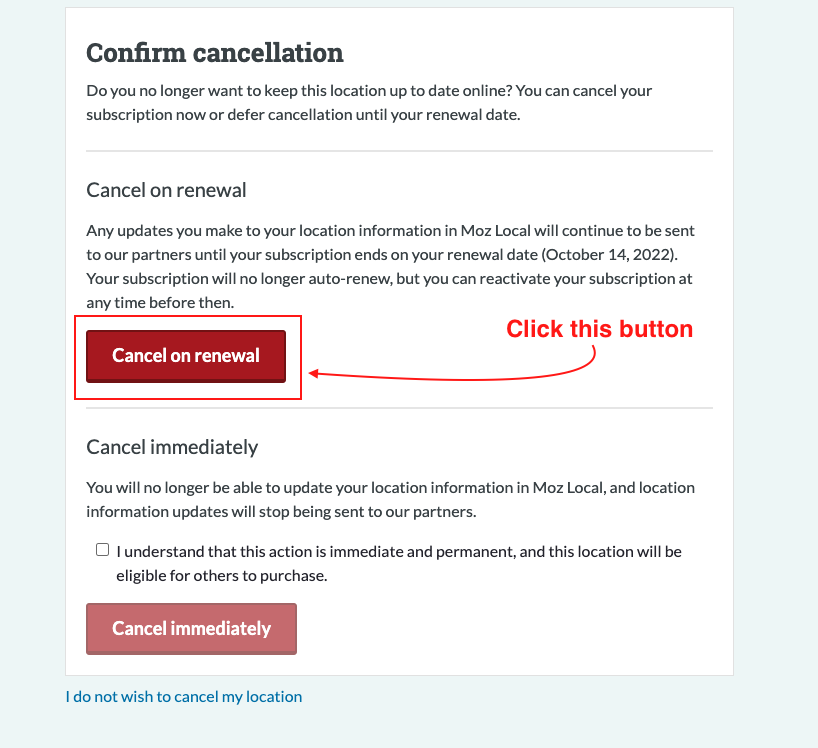
- You need to login again to confirm the cancellation. Then click the “Cancel on Renewal”
- Take a screenshot of the Subscription Summary and paste it on the task.
- Check off the task!