Hudson Creative Documentation
Payment Processing With Stripe and Gravity Forms
Payment Processing with Stripe and Gravity Forms
Stripe is a financial services company based in San Francisco, CA, USA and Dublin, Ireland. Since 2009, the company has been making it easy to process credit card details online, building a powerful, secure platform for online payments that’s also incredibly straightforward to use.
Gravity Forms is a software plugin for WordPress created by the Virginia-based company RocketGenius. The company’s signature product, Gravity Forms allows you to create reusable forms for your WordPress pages and view form submissions within the WordPress Content Management System (CMS), so that you don’t have to reinvent the wheel every time you need a contact form on your WordPress site.
While not a central feature to the plugin itself, Gravity Forms provides add-ons for payment processors like PayPal and Stripe, which can be used to process credit card payments directly through Gravity Forms. Consider this your introduction to the wild, wonderful world of payment processing in Gravity Forms, with a specific focus on the Stripe payment processor.

Installing Gravity Forms & Stripe Add-On
Gravity Forms is a WordPress plugin, and like nearly any other WordPress plugin, it can be installed in two ways: you can either download the plugin directly in the WordPress CMS, or you can add the requisite files to the backend of the site through an FTP client like Cyberduck or FileZilla.
To download Gravity Forms within the WordPress CMS, sign into WordPress using your login credentials and select “Plugins” in the navigation bar on the left-hand side of the page.

If you don’t see the “Plugins” label, it’s possible that you don’t have full administrative access to this WordPress site and need to reach out to a site administrator to get administrative access.
In the event that you do see the “Plugins” label, select the “Add New” link within this section, which will take you to a page where you can search for the plugin you’re looking for. In this case, you need to search for and install both the “Gravity Forms” plugin and the “Gravity Forms Stripe Add-On,” which provides a variety of additional features to help you process credit card payments in Gravity Forms.
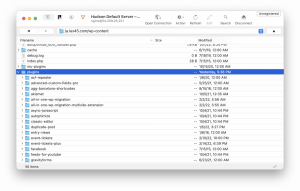
If your access options are limited within WordPress, you can also add plugins to the site via File Transfer Protocol (FTP). To do this, download both the Gravity Form plugin and Gravity Forms Stripe Add-On from the Gravity Forms website. Open the zip files for Gravity Forms and the Stripe Add-On, which should result in two new folders being created: gravityforms and gravityformsstripe. Log into your FTP client (we use Cyberduck, but feel free to use any FTP client you like) with the FTP credentials listed in the client’s ALA sheet.
From there, locate the /wp-content folder, which should contain a folder called /plugins inside. Place your new gravityforms and gravityformsstripe folder inside of the /plugins folder. Returning to your WordPress account, you should now see Gravity Forms and the Gravity Forms Stripe Add-On listed among your plugins (This might require you to refresh the page).
Activating Your Gravity Forms & Stripe Add-On Plugins
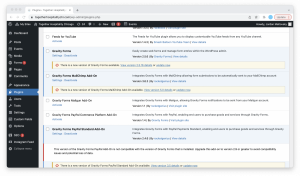
Now that you’ve installed your plugins, you need to activate them. Navigate to the plugins page within WordPress and find “Gravity Forms” and “Gravity Forms Stripe Add-On” within the menu and click the blue “Activate” link below each plugin title. This will add a new “Forms” tab to your WordPress menu, which allows you to add new forms to your site.
Creating Forms with Gravity Forms and the Stripe Add-On
To get started creating a new form, click on the “Forms” tab within WordPress, which will open the main menu within Gravity Forms. Click on the “Add New” button to create a new form from scratch. This will prompt you to give a (mandatory) title and (optional) description to your new form. Once you’ve completed those fields, click “Create Form” to get started with your new form.
Once you’ve created your new form, you’re taken to the form editor page, where you can add new fields to your form. Drag and drop the fields you want in your form from the “Add Fields” menu on the right into the space on the left. Make sure to press the “Update” button in the top-right corner to save any changes made to your form.
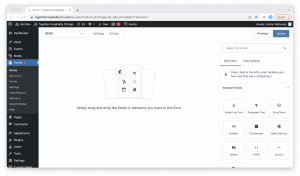
Each field can be edited to suit the needs of your form. Select the field you’re trying to edit and click on the “Field Settings” tab in the right menu to open the settings. Here, you can modify the field labels, placeholder text, default field selection, and more.
The Gravity Forms Add-On adds a new “Pricing Fields” dropdown to the “Add Fields” menu. You’ll find options to add a new “Product,” “Quantity,” “Shipping,” “Total,” and “Stripe Card” to your form. Drag the option you’re looking for to your form on the left and click the “Update” button to save your form.

Connecting Stripe to Gravity Forms
Your form won’t actually be able to communicate with Stripe until you connect it to your Stripe account. To do so, find the “Settings” dropdown in the top of your form menu and select the “Stripe” option from the dropdown.
This should take you to the “Stripe Feeds” menu, which shows each available connection (or feed) between your form and Stripe account. By default, your form will not be connected to the Stripe account, and the copy should say something like “You must add a Stripe Card field to your form before creating a feed. Let’s go add one!” with a link to create a new Stripe connection.

Click the link, or select the “Add New” button in the top right corner, to begin connecting a new card. This will take you to a new page with options to name your Stripe Feed and a dropdown to adjust the type of transaction you want to make on this form.
Transaction types are currently limited to “Products and Services” (which account for individual purchase) “Subscription” (which account for recurring purchases at intervals set within the form). Choose the option that best suits your needs and click the “Save Settings” button to continue building your form.

In the next window, you’ll be presented with the “Stripe Credit Card Field Settings,” which allow you to match the fields of your form to the fields within Stripe. Choose the “Address,” “City,” “State,” etc. that match with the corresponding fields on your form. Click the “Save Settings” button once you’ve made the changes to your form.
Viewing Gravity Forms Transactions Within Your Stripe Dashboard
The Stripe dashboard and mobile app can be handy tools for viewing transactions made with your form. To view these transactions, log into dashboard.stripe.com with the username and password for your Stripe account and select “Payments” from the menu across the top of the page. This will show all of the transactions made through your Stripe account.

Clicking on a single transaction will take you to a page with more details about the transaction. Here, you can download a transaction invoice, refund a transaction, dispute a transaction, and more. To refund a transaction, click on the “Refund…” button in the upper-right corner of that transaction page.
![]()
Embedding Your Gravity Form on the Page of Your WordPress Site
To add your form to a page within WordPress, follow these instructions from Gravity Forms.